WMT help
The CSDMS Web Modeling Tool (WMT) is the web-based successor to the desktop CSDMS Modeling Tool (CMT). WMT allows users to build and run coupled surface dynamics models on a high-performance computing cluster (HPCC) from a web browser on a desktop, laptop or tablet computer.
With WMT, a user can:
- select a Common Component Architecture (CCA) component model from a list to run in standalone mode,
- build a coupled model from multiple CCA components organized as nodes of a tree structure,
- view and edit the parameters for these model components,
- upload custom input files to the server,
- save models to a server, where they can be accessed on any computer connected to the web,
- share saved models with others in the community, and
- run a model by connecting to a remote HPCC where the components are installed.
Although WMT is web-based, the creation and configuration of a model can be done offline. Reconnection is necessary only when saving a model and submitting it for a run.
This article provides documentation for the components, forms, and controls of the WMT interface. For a short tutorial on using WMT, please see the WMT Tutorial.
The sign-in screen
The sign-in screen allows access to WMT. WMT always starts on this screen.
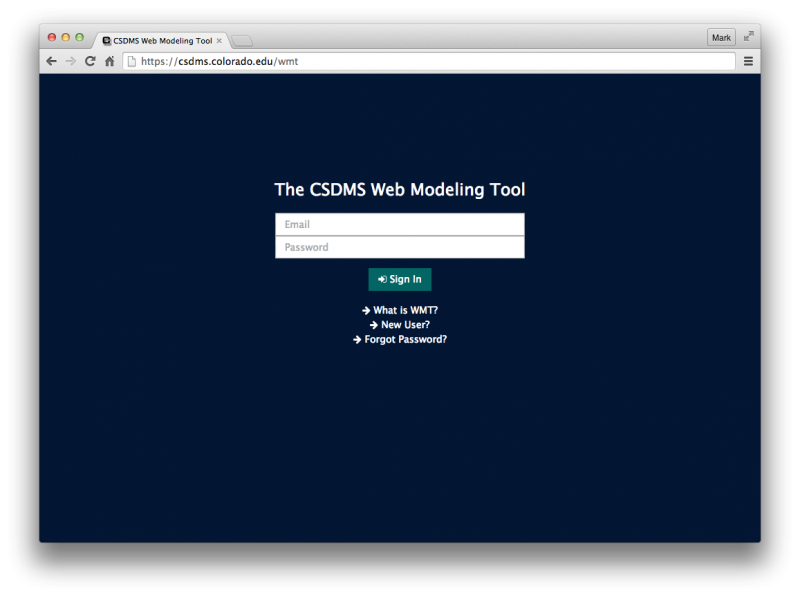
A user must provide an email address and a password to obtain access to WMT. A new user (with an email not recognized in the WMT database) will be asked to confirm their password. WMT remembers the email address of a returning user. [1]
The main interface
The WMT interface is divided into three main panels, the Header panel, the Model panel and the Parameters panel, as shown in Figure 2.
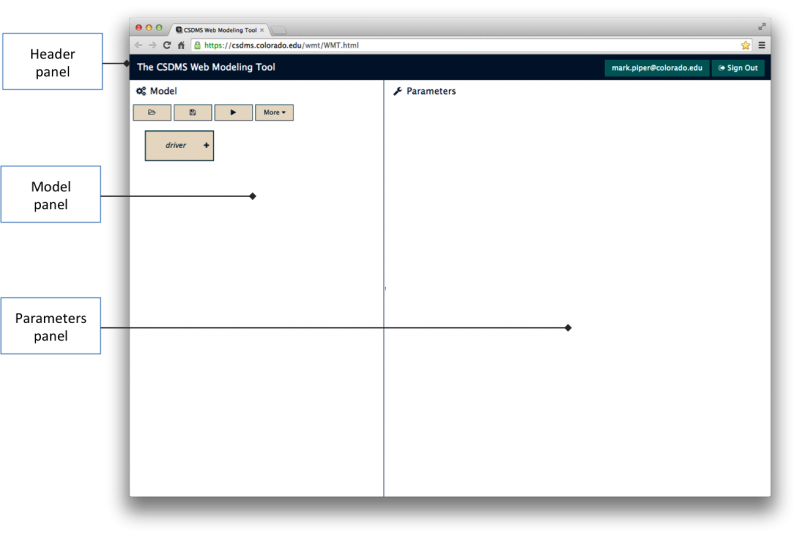
The Header panel shows the sign-in of the current user and a Sign Out button.
The Model panel is where a standalone or a coupled model can be created. The panel provides a set of buttons that allow a user to open, save, and run models, as well as a tree structure which can be used to design a standalone or a coupled model.
Though initially blank, the Parameters panel is where the tunable parameters of the model components displayed in the Model panel can be viewed and edited.
Details on these panels are provided in the following sections.
Header panel
To sign in to WMT, a user must provide a valid email address and a password. Once signed in, the user's email address is displayed, along with a Sign Out button. Users must be signed in to WMT to create, view, save and run models.
Model panel
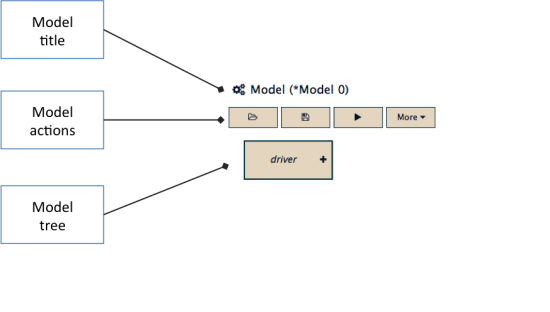
The Model panel is where standalone or coupled models can be designed, saved and run. It has three components, the Model title, the Model actions and the Model tree, as shown in Figure 3.
Model title
The Model title shows the title given to a model when saved by a user. The default model title is the generic "Model 0". An asterisk "*" is shown next to the title if the current model is not saved.
Model actions
The Model actions consist of a set of four buttons, ![]() Open,
Open, ![]() Save,
Save, ![]() Run, and
Run, and ![]() More.
More.
- Open - Presents a dialog with a list of models that can be opened in WMT.
- Save - Saves the model currently displayed in the Model panel. If this is the first time saving the model, a dialog is displayed that allows the user to enter the model title.
- Run - Runs the currently displayed model on a HPCC. Note that the model has to be saved before it can be run. For more information, see Running a model below.
- More - Displays a menu with several items:
- Save model as... - Displays a dialog that prompts the user to save the current model with a different title.
- Duplicate model... - Makes a duplicate of the current model. The model must have been saved prior to duplication. A dialog prompts the user for the name of the duplicate model.
- Delete model... - Deletes a previously saved model from WMT. Be careful: this action is irrevocable!
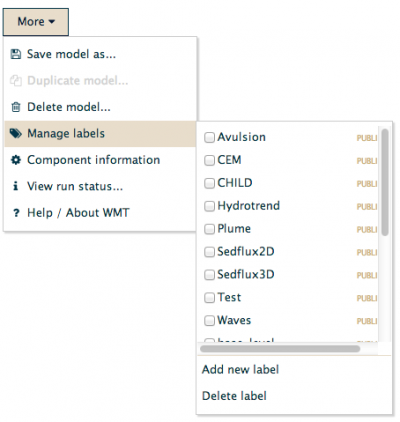
- Manage labels - Displays a list of the current model labels, with menus for adding and deleting labels. For more on labels, see Model labels below.
- Component information - Shows information on each CCA component listed in WMT, including the author, version, and a link to the component's help page on the CSDMS website.
- View run status... - View the status of a model run that has been submitted to a HPCC. When the run completes, this page also gives instructions on where to pick up the output.
- Help / About WMT - Displays the WMT version, as well as links to this document and the WMT Tutorial.
Model tree
The Model tree is where a model can be designed using CCA components. Initially, the tree is empty; it requires a component to fill the driver for the model. When the driver button is selected, the Component menu, showing a list of components registered in WMT, is displayed:
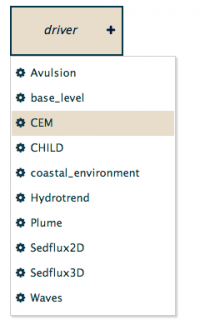
Selecting CEM, for example, as the model driver results in:
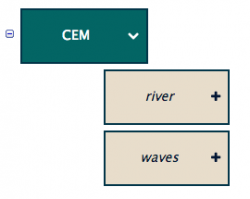
Note that CEM displays its uses ports, river and waves, as new leaves on the Model tree. These open ports can be filled with components in a similar manner.
Actions can be performed on components in the Model tree. Selecting CEM shows the Component action menu:
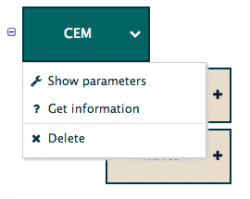
The Component action menu has three items:
- Show parameters - Displays the parameters of the model component in the Parameter table.
- Get information - Pops up a dialog with information about the model component. This action is identical to the Component information item in Model actions.
- Delete - Deletes the component from the Model tree.
Parameters panel
The Parameters panel is where the parameters of component displayed in the Model tree can be viewed and edited. It has three components, the Parameter title, the Parameter actions and the Parameter table. This panel is initially empty. However, when a component is selected as the driver for a model, the panel is populated. For example, using the CEM case from the Model tree section above, the populated Parameters panel looks like Figure 7:
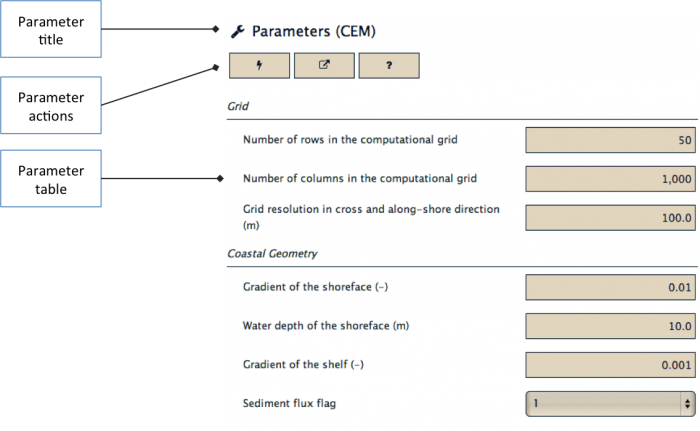
Parameter title
The Parameter title simply shows which component's parameters are currently displayed.
Parameter actions
The Parameter actions consist of a set of three buttons, ![]() Reset,
Reset, ![]() View input files, and
View input files, and ![]() Component information.
Component information.
- Reset - Resets all parameters for this model component to their default values. Be careful: this is irrevocable!
- View input files - Shows the input files generated by the parameter values of the component in either HTML, plain text, or JSON format. There are two options with this action:
- Current model - Show the input files using the current parameter values of the model component. The model must be saved in order to select this item.
- Defaults for component - Show the input files using the default parameter values of the component.
- Component information - Pops up a dialog with information about the model component. This action is identical to the Component information item in Model actions.
Parameter table
Model component parameters can be viewed and edited in the Parameter table.
A default is provided for each parameter. Each parameter undergoes type and range checks when edited. If a check fails, the parameter value is displayed with a dark red background, as a warning. Saving a model with warnings will not preclude the model from running, but the results may be invalid.
Note that when hovering over a numeric parameter value, WMT will show the possible range of values for the parameter in a tooltip (like xkcd). [2]
Running a model
To run a model in WMT, three preconditions must be met.
- The device (desktop, laptop, tablet, phablet, phone) used to submit the model to the HPCC must be connected to the Internet. However, no VPN is needed.
- The user must have an HPCC account; for example, the CSDMS HPC Blanca. To obtain an account on blanca, please see the account requirements.
- The user must have a WMT account. (This is a separate username and password from the user's HPCC account.)
Before running a model:
- the user must be logged in to WMT
- the model must be displayed in the Model panel
- the model must be saved; i.e., no asterisk next to the model name
The steps to run a model:
- Click the Run button.
- The user will be prompted for a login -- username and password -- to a HPCC, where tlogin1.rc.colorado.edu is the default.
- On successfully logging in to the HPCC, WMT will submit the model run and display a dialog. From there, or from More > View run status... the user can check on the status of the run.
- The run status page displays a link to download the output from a successful run, or an error message.
Model labels
Labels are used in WMT to organize models into categories. The label system in WMT is modeled on Gmail, and it takes the place of the projects used in CMT. Think of labels as keywords that describe a model. Alternately, labels are like Twitter hashtags -- they identify a model as belonging to a group. A key benefit of using labels is their flexibility: multiple labels can be applied to a single model, and a single label can be applied to multiple models. For example, if I'm running a series of models using HydroTrend for a poster, I might tag each model in the series with the labels Hydrotrend, AGU, and 2018. Later, when searching for a model that uses any of these labels, these models would appear in the results. When using labels, try to use short names, if possible. Also, don't use too many labels -- roughly 3-5 are usually enough to describe a model.
By default, labels are private -- they belong to the user. There are a series of "public" labels, though; currently, there is one for each CCA component that's included in WMT (e.g., Hydrotrend, Avulsion, etc.). There's also a special public label, named public. By setting this label on a model, the model is made public to all WMT users. In effect, this model has been published to the community.
To summarize:
- Public labels are shared by all users. The public label, when set on a model, makes that model available to all users.
Using labels when opening a model
When opening a model, the initial list of models displayed includes all models created by the user, as well as all public models. To narrow the set of choices, a user can filter the list of available models by selecting labels, as shown in Figure 8.
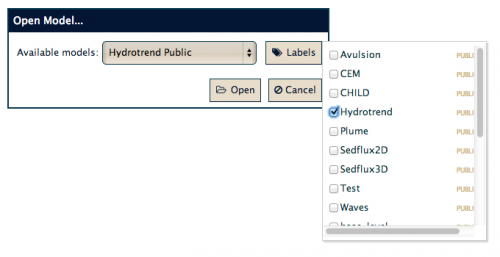
For example, to see all models that use the Plume component, select the Plume label. To see models that use Plume and are public, select the Plume and public labels. Note that by selecting these two labels, a logical AND operation is performed, so the results will be the intersection of the set of models using Plume and the set of public models. If no models match the set of selected labels, the droplist in the open dialog will be empty.
Using labels when saving a model
When saving a model, you can optionally set labels on it to categorize it and make it searchable, as shown in Figure 9.
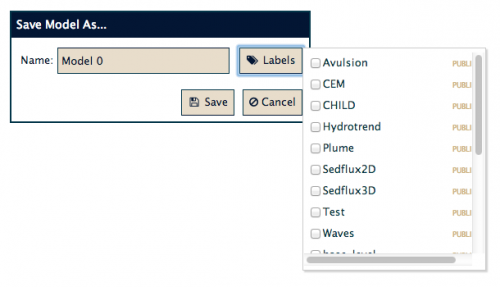
This is also where you can set the public label to share your model with others in CSDMS.
Managing labels
The Manage labels menu under the More button in the Model Panel lets you select and deselect labels for the model currently displayed in the Model panel. It also includes forms to add new labels and delete unused labels.
