Ccaffeine GUI: A guide for developers and users
Introduction
There is a graphical front-end for Ccaffeine (known as Ccaffeine GUI ) which provides a fairly simple visual programming metaphor for the assembly of applications using CCA components. We at CSDMS are releasing a modified version of the Ccaffeine GUI to make it easier for the user by providing a better look and feel with some added features as listed below. (Currently working on adding more features and to release an error proof application)
Features
Listing below is few of the added features:
- Look and Feel
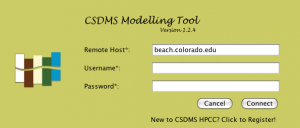
- Log in screen which frees out the task entering the log in details on the prompt
- Ssh tunneling via GUI
- Sftp transfer of files from server to local machine
- Remote Access
- Console window with saving options
- Colourful components
- With Open, Save, Save As options
- Added acces to visualization tool called VisIt
- Help (About…)
Coming up:
- Preference page
- Option to Remove/Delete components, Clear Arena etc
- Choosing color for components
- Opening the visual plot of the created model in VisIt
- More stable version
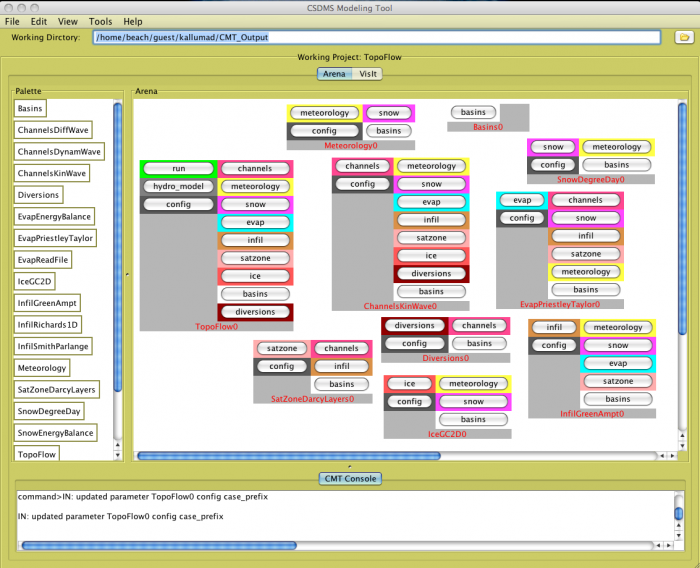
The Ccaffeine GUI works on your local machine where as you will also be able to connect to the server in just a button click. The projects residing on the server can be selected from a combo box, which opens the GUI by filling the palette with the components of the selected project. Screen shots are given below!
Login Screen:
Main Screen:
Downloads
| Version | Platform | Executable |
|---|---|---|
| 1.1 | Mac OS X | CcaffeineGUI.zip (July 2009) |
Installation Notes
- Unzip CcaffeineGUI.zip
- Double click the jar file and enter your beach username and paswword.
VisIt
Introduction
VisIt is a free interactive parallel visualization and graphical analysis tool for viewing scientific data on Unix and PC platforms. Users can quickly generate visualizations from their data, animate them through time, manipulate them, and save the resulting images for presentations. VisIt contains a rich set of visualization features so that you can view your data in a variety of ways. It can be used to visualize scalar and vector fields defined on two- and three-dimensional (2D and 3D) structured and unstructured meshes. VisIt was designed to handle very large data set sizes in the tera- to peta-scale range and yet can also handle small data sets in the kilobyte range.
Installation Notes
- Download visit install script and executable
https://wci.llnl.gov/codes/visit/executables.html
- Run the visit-install script.
This will unpack the downloaded tar file and install VisIt in the specified directory. Note that it can create a new distribution directory or update an existing distribution. This is handled automatically. The command to run the script is,
>> visit-install "version" "platform" "directory"
where,
- "version" will be 1.11.2 for the current distribution.
- "platform" will be one of the following: aix, aix64-xlc, darwin, irix6, linux-altix, linux-ia64, linux-x86_64, linux_chaos, linux_rhel3, osf1, or sunos5 depending on the machine. The one you use should match the name of the accompanying distribution file.
- "directory" is the directory you wish to install visit into.
If the directory doesn't exist the script will create it.
- For example: visit-install 1.11.2 linux_rhel3 /usr/local/visit.
Note that you will need to have the file "visit1_11_2.linux_rhel3.tar.gz" present in the current directory for this to function properly. You can install multiple binaries into the same directory. For example, you could then execute visit-install 1.11.2 linux /usr/local/visit to add a linux, 1.11.2 version of visit to the same directory.
- Add the bin directory below the installation directory (/usr/local/visit/bin in our example) to each user's search path. The best way to do this is to add it to the user's .cshrc file. The bin directory contains the visit script which starts VisIt. It can be run on many machines. The script determines the type of machine it is running on and starts the appropriate executable. If visit were installed in the directory "/usr/local/visit", then the following commands would set your search path appropriately.
   >> cd
   >> echo "set path = ($path /usr/local/visit/bin)" >> .cshrc
- Type “visit” on the command prompt
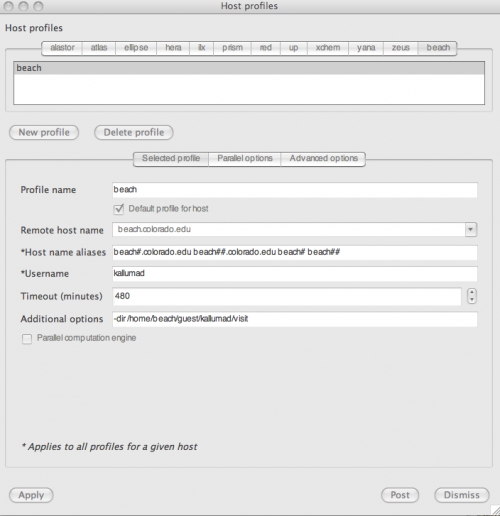
- Goto Options → Host Profiles…
Enter values as shown below if your remote m/c is beach.colorado.edu
- Select data on the remote m/c
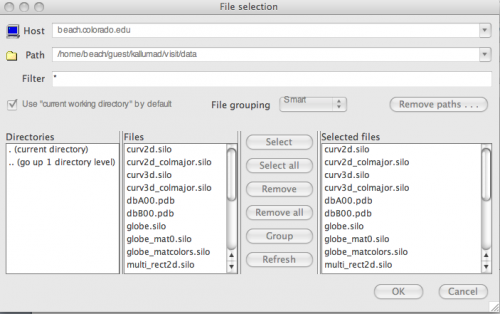
Goto File → Select Files…
Enter values as shown below if your remote m/c is beach.colorado.edu


