Help:Ccaffeine GUI
Ccaffeine GUI: A guide for developers and users
Introduction
Features
VisIt
Introduction
Installation Notes
- Download visit install script and executable
https://wci.llnl.gov/codes/visit/executables.html
- Run the visit-install script.
This will unpack the downloaded tar file and install VisIt in the specified directory. Note that it can create a new distribution directory or update an existing distribution. This is handled automatically. The command to run the script is,
>> visit-install "version" "platform" "directory"
where,
- "version" will be 1.11.2 for the current distribution.
- "platform" will be one of the following: aix, aix64-xlc, darwin, irix6, linux-altix, linux-ia64, linux-x86_64, linux_chaos, linux_rhel3, osf1, or sunos5 depending on the machine. The one you use should match the name of the accompanying distribution file.
- "directory" is the directory you wish to install visit into.
If the directory doesn't exist the script will create it.
- For example: visit-install 1.11.2 linux_rhel3 /usr/local/visit.
Note that you will need to have the file "visit1_11_2.linux_rhel3.tar.gz" present in the current directory for this to function properly. You can install multiple binaries into the same directory. For example, you could then execute visit-install 1.11.2 linux /usr/local/visit to add a linux, 1.11.2 version of visit to the same directory.
- Add the bin directory below the installation directory (/usr/local/visit/bin in our example) to each user's search path. The best way to do this is to add it to the user's .cshrc file. The bin directory contains the visit script which starts VisIt. It can be run on many machines. The script determines the type of machine it is running on and starts the appropriate executable. If visit were installed in the directory "/usr/local/visit", then the following commands would set your search path appropriately.
   >> cd
   >> echo "set path = ($path /usr/local/visit/bin)" >> .cshrc
- Type “visit” on the command prompt
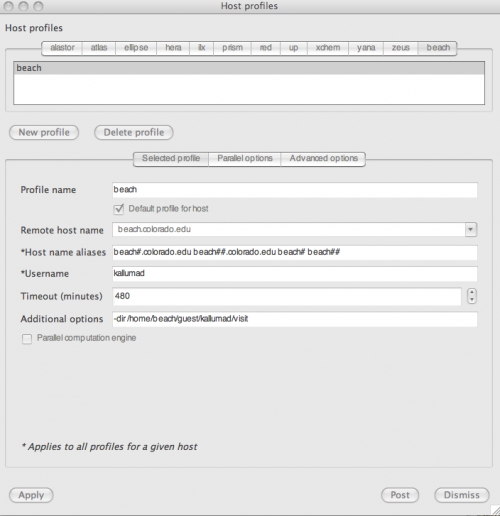
- Goto Options → Host Profiles…
Enter values as shown below if your remote m/c is beach.colorado.edu
- Select data on the remote m/c
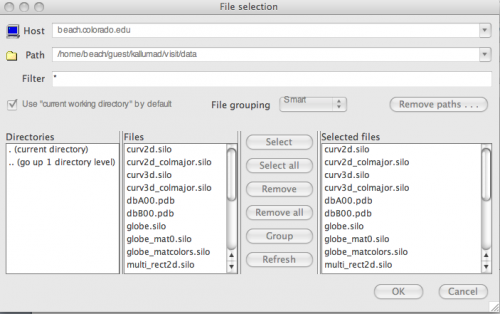
Goto File → Select Files…
Enter values as shown below if your remote m/c is beach.colorado.edu


