
Getting
Started with the CSDMS Modeling Tool (CMT)
Jisamma
Kallumadikal and Irina Overeem
May 2010
1. What is the CSDMS
Modeling Tool?
The CSDMS Modeling Tool (CMT) allows you to couple and run CSDMS components on the CSDMS supercomputer in a user-friendly environment. A component can be any unit that encapsulates some useful functionality, most often a model or function.
The purpose of the tool is to provide an environment in which these components can be linked together to form applications. There is a graphical front-end for Ccaffeine (known as Ccaffeine GUI) which provides a fairly simple visual programming metaphor for the assembly of applications using CCA components. We at CSDMS are developing a modified version of the Ccaffeine GUI called the CSDMS Modeling Tool to make building earth system modeling application easy for a model user, by providing a better look and experience with many added features.
Objective of this
guide
This guide 1) explains how to start up the CSDMS Modeling Tool, and 2) the layout of the CSDMS Modeling Tool.
2. How to start up
the CSDMS Modeling Tool (CMT).
1. To
connect to the CSDMS HPCC you need to setup Virtual Private Network (VPN). Read
and install from here: http://www.colorado.edu/its/vpn/
2. Go
to http://csdms.colorado.edu/wiki/Help:Ccaffeine_GUI#Downloads
a. To
run CMT without downloading it click the ‘Run CMT now’, which will run CMT
through Java web start.
b. Click
and download the zip file to your computer and unzip it. Double click the
extracted file. This will bring up the CMT login screen.
3. Layout of CSDMS
Modeling Tool
1. Login Screen:
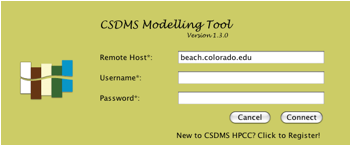
The CSDMS High Performance Computing System can be reached by remote access. For this you do need to be a registered CSDMS member and HPCC user. For security reasons the application of an account takes ~3 days, after that procedure you will gain full access to HPCC and start using it with your own username and password.
- Enter Remote Host name, which will be beach.colorado.edu
- Enter your CSDMS HPCC username.
- Enter your CSDMS HPCC password.
- The “Connect” button does an ssh tunneling to the CSDMS server.
2. Main Screen:
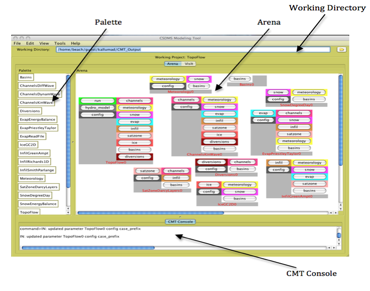
o The Palette (on the left): This contains the list of available components of the selected project
o The Arena (on the right): You can create your own model simulation by dragging the components from the palette into the arena.
o Working Directory (on the top): Outputs will be written in to this folder if specified in the configuration of the working project. The working directory should always be a directory on CSDMS HPCC and should be set before opening the project. By default the working directory will always be your home folder on the CSDMS HPCC.
o CMT Console (lowermost window): Displays all the system output and the client-server communication. This is to monitor progress of your simulation and for debugging purposes. You have options to save this output as a text file. Goto FileàSave Console O/P
o If the ‘wireless’ option (in the View à Wireless) is checked, components that you dragged in to the arena for your experiment will be automatically connected to the corresponding ports on the components it needs to 1) get values from, or 2) hand values to.
3. Menu Bar:
File
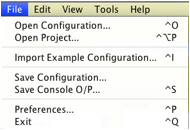
o Open Configuration: It is possible to load existing configurations, these are stored in files with a “.bld” extension. Opens a “bld” file residing on the server (beach.colorado.edu) or on your local machine. Note: Selected bld file should contain components available from the opened project/model only.
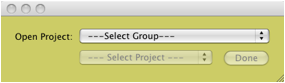
o Open Project: This option allows the user to choose a project to work on.
o Import Example Configuration: Opens up an example bld file, which is specific for the currently opened project. These files are kept on the CSDMS HPCC server as examples for new users.
o Save Configuration: Saves the model in the arena as a bld file on your local machine
o Save Console O/P: Saves the output as a text file on your local machine.
o Preferences: Opens the ‘Preference page’. The options are explained below. This allows you to personalize the CSDMS modeling Tool to your preferred layout and look. Note: All the selections in the preference window will be saved for future sessions
o Preference Submenu:
Main
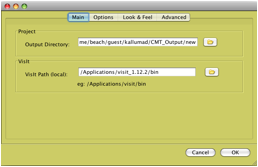
o Output Directory: Outputs will be written in to this. If the selected project is configured so as to write outputs then these outputs will be written into the working directory. By default this will your home folder on CSDMS HPCC.
o VisIt Path(local): The path to your local VisIt installation. Note: To run VisIt, it should be installed on your machine. Instructions on installation are given on our wikipage: http://csdms.colorado.edu/wiki/Help:Ccaffeine_GUI#VisIt_-_Introduction
Options
o Palette usually contains Component names along with their class names. This option allows you to choose a shorter name by not displaying the class names.
o CMT usually creates a folder called CMT_Files in the working directory of the application. The log files will be written to this folder. User has the option to remove these logs on exit.
o By default CMT shows the toolbar, which displays button with icon for Stop run, Refresh, Reload, Wireless, Wired and Exit functionalities.
o Option to check wireless or wired mode.

Look & Feel
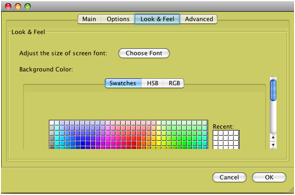
o Font Size on the screen can be adjusted to any size.
o The background color of the application can be chosen from the color palette, which will then be applied to all screens of this application.
Advanced
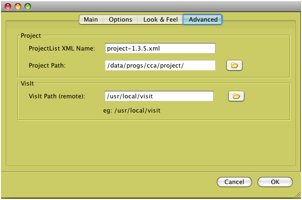
o ProjectList XML Name: this is an xml file residing on the server, which contains all the project details. The CMT uses this file to display and read the available projects on the server.
o Project Path: This is the path where all the CCA projects are available on beach
o VisIt Path (remote): Path to the remote installation which is where VisIt is installed on the server (beach)
Edit
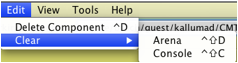
o Delete Component: Deletes a selected component from the Arena. Other options are to right click on the component and click the remove button, or to by drag it back to the palette.
o Clear Arena: Clears the entire Arena by removing all components and their connections
o Clear Console: Clears the Console screen.
View
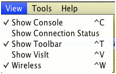
o Show Console: You have the option to display or not to display the console window. Unchecking the ‘Show Console’ option makes the console screen invisible thereby enlarging the Arena.
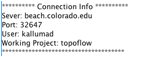
o Show Connection status: This will display connection information on the CMT Console as shown below.
o Show Toolbar: Displays the tools with icons.
o Show VisIt: Changes to the VisIt window.
o Wireless: If the ‘wireless’ option is checked, components that you dragged in to the arena for your experiment will be automatically connected to the corresponding ports on the components it needs to get values from or hand values to.
Tools
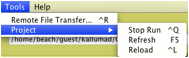
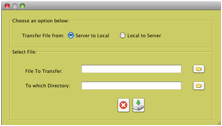
o Remote File Transfer: User can transfer a file residing on server (beach) to the local machine or vice versa.
o Project
o Stop Run: Halts an ongoing run. To continue refresh and reload the project.
o Refresh: Restarts CMT
o Reload: Reloads the project, which was in the Arena before the refresh, has happened.